Angular Course
Angular is a TypeScript-based open-source front-end web application platform led by the Angular Team at Google and by a community of individuals and corporations. Angular is a complete rewrite from the same team that built AngularJS. But let me tell you that Angular is completely different from AngularJS. Let us understand the differences between Angular and AngularJS.
Differences between Angular and AngularJS
- The architecture of an Angular application is different from AngularJS. The main building blocks for Angular are modules, components, templates, metadata, data binding, directives, services, and dependency injection. We will be looking at it in a while.
- Angular does not have a concept of “scope” or controllers instead, it uses a hierarchy of components as its main architectural concept.
- Angular has a simpler expression syntax, focusing on “[ ]” for property binding, and “( )” for event binding
- Mobile development – Desktop development is much easier when mobile performance issues are handled first. Thus, Angular first handles mobile development.
- Modularity – Angular follows modularity. Similar functionalities are kept together in same modules. This gives Angular a lighter & faster core.
Angular recommends the use of Microsoft’s TypeScript language, which introduces the following features:
- Class-based Object-Oriented Programming
- Static Typing
TypeScript 3.4:
Angular 8 requires TypeScript 3.4 for web development
Opt-n Ivy Preview:
Ivy is the name given to Angular’s next-generation compilation and rendering pipeline. This will help you optionally preview your website to see how it works
Differential Loading:
As a part of its build process, Angular 8 CLI will be able to produce both legacy and modern JS bundles i.e ES5 and ES2015+. This implies a differentially-loaded client-side with improved speed and TTI (Time to Interactive) for the present browsers
Backward compatibility of Router:
This helps in simplifying the upgrade path for large projects
Opt-in Usage Sharing:
With this feature, the Angular team will be able to collect anonymous information with your consent to keep a track of the commands that are used and the time taken to build your projects
Dependency Updates:
Angular 8 has updated the dependencies on tools like RxJS, Node, and TypeScript (as mentioned earlier) for better performance and sync with the current environment
Web Worker Building:
Web workers allow you to write code that runs separately from the main thread. This improves speed by parallelizing multiple tasks. The developers of Angular 8 have added bundling support for web workers as a result of requests from developers
To install angular CLI we need nodejs and npm. First let’s understand what these are and why we need them.
Let’s start with nodejs installation post completion on nodejs we will install angular CLI and create a new angular project
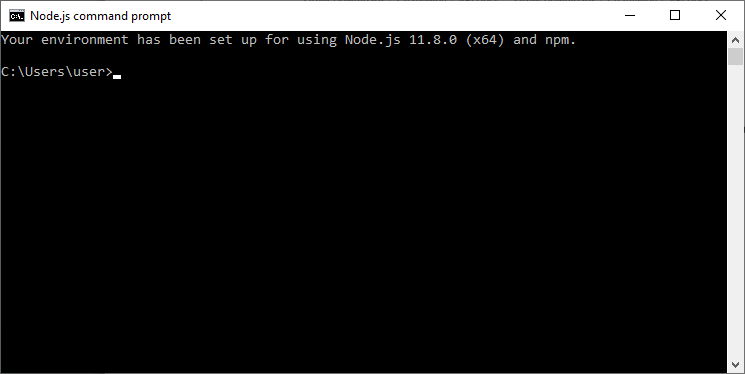
Install Node.js
You should install node.js to run your Angular 7 app. It manages npm dependencies to support some browsers when loading particular pages. It provides required libraries to run Angular project. Node.js serves your run-time environment as your localhost.
Just go to node.js official website https://nodejs.org/en/
Download and install the latest version of node.js.

After the successful installation, you will see command prompt like this:
Use npm to install Angular CLI
Run the Angular CLI command to install Angular CLI
npm install -g @angular/cli or
Just go to Angular CLI official website https://cli.angular.io/
You will see the whole CLI command to create an Angular app. You need to run the first command to install Angular CLI. These steps are the same for Windows and Mac.
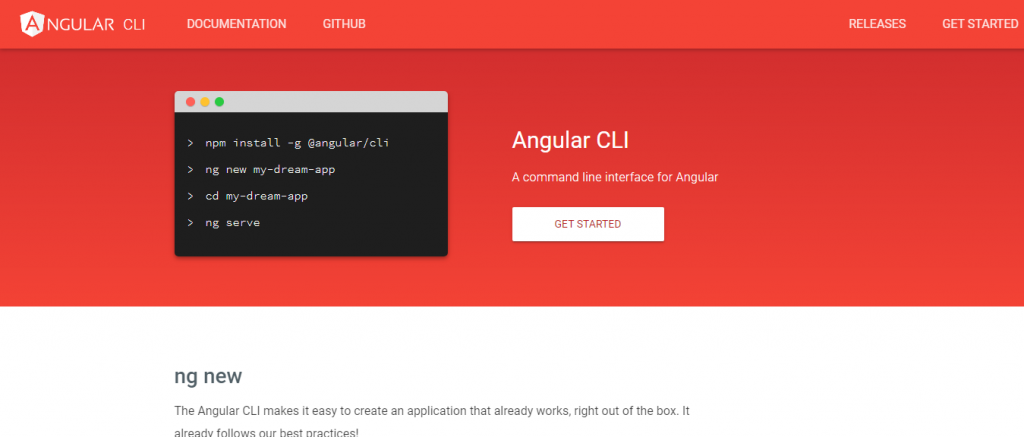
npm install -g @angular/cli
ng new my-dream-app
cd my-dream-app
ng serve What is Nodejs and Why you need for angular development?
Node.js is an open-source, cross-platform JavaScript run-time environment that executes JavaScript code outside of a browser. Node.js lets developers use JavaScript to develop wide variety of applications like network applications, command-line tools, web api, web applications. You need nodejs for dev tooling (like local webserver with live reloading features) and dev experience, you do not need nodejs to run react in production.
What is npm and Why you need for angular development?
Npm stands for node package manager, it is a dependency management tool for javascript applications. This tool will help to install the libraries and other tools to support angular development.
we can add Angular Material to our application through the schematics.
Step 1 :
Open Terminal then go to Current project folder path
Step 2 :
ng add @angular/materialStep 3:
And make sure you select the following options for the questions.

The first question will ask if you want to use one of the pre-built themes or use your own, in this case, we are going to create our own theme.
The second question is to enable gesture recognition particularly helpful for mobile applications, for this HammerJS will be added to the list of libraries in the package.json and in the application configuration.
Finally, the last question is if you want to enable the angular default animations, let’s leave it so we can have the full functionality for now.
In your IDE navigate to the file “src/app/app.module.ts”, and import the following modules:
import { MatInputModule, MatButtonModule, MatSelectModule, MatIconModule } from '@angular/material';
import { FormsModule } from '@angular/forms';
And then add them to the imports array:
imports: [
    BrowserModule,
    BrowserAnimationsModule,
    FormsModule,
    MatInputModule,
    MatButtonModule,
    MatSelectModule,
    MatIconModule
  ],
The next step is to add some components, so go to “src/app/app.component.html” and add the following code:
<mat-form-field>
  <input matInput placeholder="Simple Input" [(ngModel)]="title">
</mat-form-field>
<mat-icon>home</mat-icon>
<button mat-raised-button>I'm a button</button>we will learn how to quickly integrate HttpClient service in Angular 8 application to consume RESTful API JSON data from the server.
HttpClient enables the communication between client and server through many available methods like get(), post(), put(), delete() etc. We will also add Error handling techniques using RxJS operators at one place in our service.
For demonstrating real-world scenarios, here we will create a Student management application with the following operations:
- Create a new Student record using the post() method.
- List/Get Students data to show in a table using get() method.
- Update any Student data by clicking on Edit put() method.
- Delete any Student by clicking Delete on table row using delete() method.
- HttpClient was introduced after Angular v4.3 so if you have later version you can simply continue
Step 1: First, we will create a new Angular project using the latest version of Angular CLI. If you don’t have it just install by running following NPM commandLif already angular installed ignore this steps
> npm install @angular/cli –gStep 2: Create a Angular Project Run following CLI command to create a new Angular project
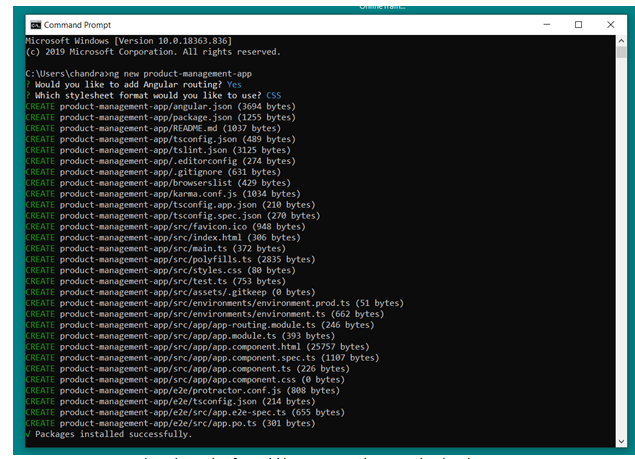
>> ng new angular-httpclient-application? Would you like to add Angular routing? Yes
? Which stylesheet format would you like to use? CSS
Now enter the project
> cd angular-httpclient-applicationStep 3: To show controls to create new records, list of Students and update existing Student information, we will create new components in our project.
Run the following commands to generate new components to create, update and list students data.
> ng generate component student-create –skipTests=true
> ng generate component student-edit –skipTests=true
> ng generate component student-list –skipTests=true
Above ng generate command will automatically inject the components in App’s main module. We also added FormsModule to use [(ngModel)] in our components.
Step 4: ( Implement HttpClient in Project):To make remote server calls and consume JSON responses from RESTful API, we will setup HttpClient which is responsible for making a communication channel between application at client and server-side API.
Step 5: (Inject HttpClient Module)Now open app’s main module app.module.ts file to import HttpClientModule from ‘@angular/common/http’ then add in imports array of @NgModule decorator as shown below:
import { BrowserModule } from '@angular/platform-browser';
import { NgModule } from '@angular/core';
import { AppRoutingModule } from './app-routing.module';
import { AppComponent } from './app.component';
import { HttpClientModule } from '@angular/common/http';
@NgModule({
  declarations: [
    AppComponent
  ],
  imports: [
    BrowserModule,
    AppRoutingModule,
    HttpClientModule
  ],
  providers: [],
  bootstrap: [AppComponent]
})
export class AppModule { }
Step 6: (Update Routing Module) Also, update app-routing.module.ts file to add the route paths for above new added components.
//app-routing.module.ts
import { NgModule } from '@angular/core';
import { Routes, RouterModule } from '@angular/router';
import { StudentCreateComponent } from './student-create/student-create.component';
import { StudentEditComponent } from './student-edit/student-edit.component';
import { StudentListComponent } from './student-list/student-list.component';
const routes: Routes = [
  { path: '', pathMatch: 'full', redirectTo: 'create' },
  { path: 'create', component: StudentCreateComponent },
  { path: 'edit/:id', component: StudentEditComponent},
  { path: 'list', component: StudentListComponent }
];
@NgModule({
  imports: [RouterModule.forRoot(routes)],
  exports: [RouterModule]
})
export class AppRoutingModule { }
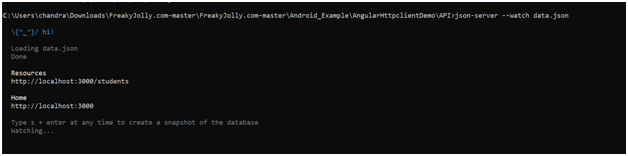
Step 7: (Create Dummy Database using JSON Server)To test our HTTP calls, we will create a mock server on over project root folder with a data.json file acting as an API response from the server.
JSON-server NPM package creates a local server very easily for development purposes.
Run following NPM command to install JSON-server package:
> npm install -g json-serverCopy
{
  "students": [
  {
    "id": 1,
    "name": "Chandra",
    "age": "36",
    "address": "West Venkatapuram,Secundarabad - 50010"
  },{
    "id": 2,
    "name": "Charan",
    "age": "8",
    "address": "West Venkatapuram,Secundarabad - 50010"
  },{
    "id": 3,
    "name": "Madhavi",
    "age": "28",
    "address": "West Venkatapuram,Secundarabad - 50010"
  },{
    "id": 4,
    "name": "Anjaneyulu",
    "age": "70",
    "address": "Chirala,Prakasam District,AP-523135"
  },{
    "id": 5,
    "name": "Suguna Kumari",
    "age": "65",
    "address": "Chirala,Prakasam District,AP-523135"   }
  ] }
Now place data.json file in folder API/data.json with following data:
You can run server response by running following NPM command:
> json-server –watch API/data.jsonCopy
It will return a smiley face \{^_^}/ hi! with the server data path: http://localhost:3000/students
Step 8: Create an Interface class for Students data by running following command defining the type of values for student item.
> ng generate class models/StudentCopy
then replace the following content in the newly created file “~/models/student.ts”
export class Student {
   id: number;
   name: string;
   age: string;
   address: string;
}
Step 9 : Create Angular Service to Communicate Server using HttpClient methods
For making HTTP calls we will now create a new service which will keep server communication and error handling login separate from rest of the application. This service will import HttpClient services and method using which we will do CRUD operation on data.
Now create a new service file named api.service.ts under services folder by running following ng generate command:
> ng generate service services/api –skipTests=true
–skipTests=true option will not generate spec test files.
Now we will add methods in our api.service.ts file for communicating API server through different HttpClient methods. Here we also added RxJS Observable and Operators to handle errors. handleError() method is handling any error reported by HTTP calls.
For getting JSON response from the server we need to set the ‘Content-Type’ of every with ‘application/json’
import { Injectable } from '@angular/core';
import { HttpClient, HttpHeaders, HttpErrorResponse } from '@angular/common/http';
import { Student } from '../model/student';
import { Observable, throwError } from 'rxjs';
import { retry, catchError } from 'rxjs/operators';
@Injectable({
  providedIn: 'root'
})
export class ApiService {
  // API path
  base_path = 'http://localhost:3000/students';

  constructor(private http: HttpClient) { }

  // Http Options
  httpOptions = {
    headers: new HttpHeaders({
      'Content-Type': 'application/json'
    })
  }

  // Handle API errors
  handleError(error: HttpErrorResponse) {
    if (error.error instanceof ErrorEvent) {
      // A client-side or network error occurred. Handle it accordingly.
      console.error('An error occurred:', error.error.message);
    } else {
      // The backend returned an unsuccessful response code.
      // The response body may contain clues as to what went wrong,
      console.error(
        `Backend returned code ${error.status}, ` +
        `body was: ${error.error}`);
    }
    // return an observable with a user-facing error message
    return throwError(
      'Something bad happened; please try again later.');
  };
  // Create a new item
  createItem(item): Observable<Student> {
    return this.http
      .post<Student>(this.base_path, JSON.stringify(item), this.httpOptions)
      .pipe(
        retry(2),
        catchError(this.handleError)
      )
  }
  // Get single student data by ID
  getItem(id): Observable<Student> {
    return this.http
      .get<Student>(this.base_path + '/' + id)
      .pipe(
        retry(2),
        catchError(this.handleError)
      )
  }
  // Get students data
  getList(): Observable<Student> {
    return this.http
      .get<Student>(this.base_path)
      .pipe(
        retry(2),
        catchError(this.handleError)
      )
  }
  // Update item by id
  updateItem(id, item): Observable<Student> {
    return this.http
      .put<Student>(this.base_path + '/' + id, JSON.stringify(item), this.httpOptions)
      .pipe(
        retry(2),
        catchError(this.handleError)
      )
  }
  // Delete item by id
  deleteItem(id) {
    return this.http
      .delete<Student>(this.base_path + '/' + id, this.httpOptions)
      .pipe(
        retry(2),
        catchError(this.handleError)
      )
  }

}
Step 10: (Update Component Classes and Templates) To style our components, we will add bootstrap.css file in the <head> section of our index.html file
import { Component, OnInit } from '@angular/core';
import { Student } from '../models/student';
import { ApiService } from '../services/api.service';
import { Router } from '@angular/router';
@Component({
  selector: 'app-student-create',
  templateUrl: './student-create.component.html',
  styleUrls: ['./student-create.component.css']
})
export class StudentCreateComponent implements OnInit {
  data: Student
  constructor(
    public apiService: ApiService,
    public router: Router
  ) {
    this.data = new Student();
  }
  ngOnInit() {
  }
  submitForm() {
    this.apiService.createItem(this.data).subscribe((response) => {
      this.router.navigate(['list']);
    });
  }
}
Step 11: (Creat Student Component) In Create component template we will add a form to take Name, Age, and Address values from the user which will get submitted using submitForm() method. Update student-create.component.html file with below code:
<div class="container">
    <h3>Create Student Record</h3>
        <div class="form-group">
            <label for="name">Name</label>
            <input type="text" class="form-control" id="name" [(ngModel)]="data.name" placeholder="Enter Name">
        </div>
        <div class="form-group">
            <label for="age">Age</label>
            <input type="text" class="form-control" id="age" [(ngModel)]="data.age" placeholder="Enter Name">
        </div>
        <div class="form-group">
            <label for="address">Address</label>
            <input type="text" class="form-control" id="address" [(ngModel)]="data.address" placeholder="Enter Name">
        </div>
        <button type="submit" class="btn btn-primary" (click)="submitForm()">Add</button>
</div>
Step 12: (In the student-create.component.ts file), we will have the submitForm() method to call API service method createItem() to return an Observable. After successfully submitting value we will navigate to list page using Router service.
import { Component, OnInit } from '@angular/core';
import { Student } from '../models/student';
import { ApiService } from '../services/api.service';
import { Router } from '@angular/router';
@Component({
  selector: 'app-student-create',
  templateUrl: './student-create.component.html',
  styleUrls: ['./student-create.component.css']
})
export class StudentCreateComponent implements OnInit {
  data: Student
  constructor(
    public apiService: ApiService,
    public router: Router
  ) {
    this.data = new Student();
  }
  ngOnInit() {
  }
  submitForm() {
    this.apiService.createItem(this.data).subscribe((response) => {
      this.router.navigate(['list']);
    });
  }
}

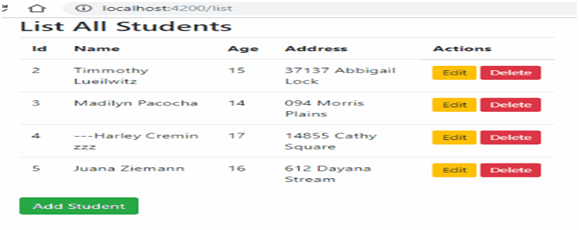
Step 13: ( List Students Component) In list component, we will list all Students in our data.json file in a bootstrap table with rows iterating using *ngFor directive.
The table will also have an Action colum to show Edit and Delete buttons. In Edit action we are simply redirecting to Edit component with item id which we will update in later. The delete button will call delete method in our API service.
Replace the student-list.column.html file with the following code:
<div class="container">
  <h3>List All Students</h3>
  <table class="table">
    <thead>
      <tr>
        <th scope="col">Id</th>
        <th scope="col">Name</th>
        <th scope="col">Age</th>
        <th scope="col">Address</th>
        <th scope="col">Actions</th>
      </tr>
    </thead>
    <tbody>
      <tr *ngFor="let item of studentsData">
        <td>{{item.id}}</td>
        <td>{{item.name}}</td>
        <td>{{item.age}}</td>
        <td>{{item.address}}</td>
        <td style="display: flex">
            <button type="button" class="btn btn-warning btn-sm" [routerLink]="[ '/edit/${item.id}']">Edit</button>
            <button type="button" class="btn btn-danger btn-sm ml-1" (click)="delete(item)">Delete</button>
        </td>
      </tr>
    </tbody>
  </table>
  <button type="button" class="btn btn-success" [routerLink]="[ '/create']">Add Student</button>
</div>
Step 14: In the student-list.component.ts file, we will get the list of all students by calling getList() and also add delete() to call deleteItem() method in API service.
//student-list.component.ts
import { Component, OnInit } from '@angular/core';
import { ApiService } from '../services/api.service';

@Component({
  selector: 'app-student-list',
  templateUrl: './student-list.component.html',
  styleUrls: ['./student-list.component.css']
})
export class StudentListComponent implements OnInit {

  studentsData: any;
  constructor(
    public apiService: ApiService
  ) {
    this.studentsData = [];
  }
  ngOnInit() {
    this.getAllStudents();
  }
  getAllStudents() {
    //Get saved list of students
    this.apiService.getList().subscribe(response => {
      console.log(response);
      this.studentsData = response;
    })
  }
  delete(item) {
    //Delete item in Student data
    this.apiService.deleteItem(item.id).subscribe(Response => {
      //Update list after delete is successful
      this.getAllStudents();
    });
  }
}

Step 15: (Update/ Edit Student Item) In Edit component we will get the id of item using ActivatedRoute service then get its details. After that, we will show Form field controls to edit them, after that user can update the value to call the updateItem method in API service.
In the student-edit.component.html file replace following HTML content:
<div class="container">
        <h3>Edit Student Record</h3>
               <div class="form-group">
                <label for="name">Name</label>
                <input type="text" class="form-control" id="name" [(ngModel)]="data.name" placeholder="Enter Name">
            </div>
            <div class="form-group">
                <label for="age">Age</label>
                <input type="text" class="form-control" id="age" [(ngModel)]="data.age" placeholder="Enter Name">
            </div>
            <div class="form-group">
                <label for="address">Address</label>
                <input type="text" class="form-control" id="address" [(ngModel)]="data.address" placeholder="Enter Name">
            </div>
            <button type="submit" class="btn btn-success" (click)="update()">Update</button>
            <button type="submit" class="btn btn-warning ml-1" [routerLink]="[ '/list']">Cancel</button>
    </div>
Step 16: Now in student-edit.component.ts file replace following class component code:
//student-edit.component.ts
import { Component, OnInit } from '@angular/core';
import { ActivatedRoute, Router } from '@angular/router';
import { Student } from '../models/student';
import { ApiService } from '../services/api.service';
@Component({
  selector: 'app-student-edit',
  templateUrl: './student-edit.component.html',
  styleUrls: ['./student-edit.component.css']
})
export class StudentEditComponent implements OnInit {
  id: number;
  data: Student;
  constructor(
    public activatedRoute: ActivatedRoute,
    public router: Router,
    public apiService: ApiService
  ) {
    this.data = new Student();
  }
  ngOnInit() {
    this.id = this.activatedRoute.snapshot.params["id"];
    //get item details using id
    this.apiService.getItem(this.id).subscribe(response => {
      console.log(response);
      this.data = response;
    })
  }
  update() {
    //Update item by taking id and updated data object
    this.apiService.updateItem(this.id, this.data).subscribe(response => {
      this.router.navigate(['list']);
    })
  }
}
Step 17: That’s it now you are ready to run your app by hitting following command
> ng serve –open
Step 18: Don’t forget to run the json-server to up API server by running following command in a separate console.
> json-server –watch API/data.json
Note: Angular Application to run use the following command before start the server
npm install –save-dev @angular-devkit/build-angular
check Project Structure
Thank you. Refer any One Interested for Angular Training
Step 1:
create a angular project by using following command
step2:
open project into Visual Studio Code after add bootstrap code into index.html
->copy css from getbootstrap.com site or else use following one https://getbootstrap.com/docs/4.5/getting-started/introduction/
Just copy css link and add into index.html head section
<link rel="stylesheet" href="https://stackpath.bootstrapcdn.com/bootstrap/4.5.0/css/bootstrap.min.css" integrity="sha384-9aIt2nRpC12Uk9gS9baDl411NQApFmC26EwAOH8WgZl5MYYxFfc+NcPb1dKGj7Sk" crossorigin="anonymous">
->same kind of way copy js file and into index.html before closing body tag
<script src="https://code.jquery.com/jquery-3.5.1.slim.min.js" integrity="sha384-DfXdz2htPH0lsSSs5nCTpuj/zy4C+OGpamoFVy38MVBnE+IbbVYUew+OrCXaRkfj" crossorigin="anonymous"></script>
<script src="https://cdn.jsdelivr.net/npm/[email protected]/dist/umd/popper.min.js" integrity="sha384-Q6E9RHvbIyZFJoft+2mJbHaEWldlvI9IOYy5n3zV9zzTtmI3UksdQRVvoxMfooAo" crossorigin="anonymous"></script>
<script src="https://stackpath.bootstrapcdn.com/bootstrap/4.5.0/js/bootstrap.min.js" integrity="sha384-OgVRvuATP1z7JjHLkuOU7Xw704+h835Lr+6QL9UvYjZE3Ipu6Tp75j7Bh/kR0JKI" crossorigin="anonymous"></script>
Step 3:
just run and check boot strap working fine or not by using following command
ng serve –o to see the effect add following code in to app.component.ts
<div class="container">
<div class="row">
<div class="col-md-8">
<h3 class="text-center" style="width: 1200px;color:red;margin: 10px 10px 10px -54px;">{{title}}</h3>
</div>
<div class="col-md-4">
<div class="alert alert-success alert-dismissable" *ngIf="msg">
<a href="#" class="close" (click)="clickMe()">×</a>
{{msg}}
</div>
</div>
</div>
step4: add FormsModule,HttpClientModule(future purpose) in app.modules.ts
import { BrowserModule } from '@angular/platform-browser';
import { NgModule } from '@angular/core';
import { FormsModule } from '@angular/forms';
import { HttpClientModule } from '@angular/common/http';
import { AppComponent } from './app.component';
@NgModule({
declarations: [
AppComponent,
],
imports: [
BrowserModule,
FormsModule,
HttpClientModule,
],
providers: [],
bootstrap: [AppComponent]
})
export class AppModule { }
step5: first add product Array into app.component.ts file
products = [
{name:"Rice", qty:"25", price:"1300",},
{name:"Soap", qty:"25", price:"85",},
{name:"Oil", qty:"1L", price:"95",}
];
Step6: To display the array Elements in app.component.html add the following code along with bootstrap
<h2>Read data & (Delete data):</h2>
<table class="table table-bordered">
<thead>
<tr>
<th width=400>Name</th>
<th width=400>Quantity</th>
<th width=400>Price</th>
<th width=250>Actions</th>
</tr>
</thead>
<tbody>
<tr *ngFor="let product of products; let i=index">
<td>{{product.name}}</td>
<td>{{product.qty}}</td>
<td>{{product.price}}</td>
<td>
<a class="btn btn-success" (click)="editProduct(i)">Edit</a>
<a class="btn btn-danger" (click)="deleteProduct(i)">Delete</a>
</td>
</tr>
</tbody>
</table>
Note:editProduct()/deleteProduct() methods at once we can implement in just app.component.ts following code coming steps fully implementing
editProduct(k){
}
deleteProduct(i){
}
Step 7: now concentrate to add product element for that add the following code in app.component.html above display array code
<div class="clearfix"></div>
<hr>
<h2>Create data:</h2>
<form class="form-horizontal">
<div class="form-group">
<label class="control-label col-sm-2" for="name">Name :</label>
<div class="col-sm-10">
<input type="text" class="form-control" id="name"
name="name" [(ngModel)]="model.name" placeholder="Enter your name">
</div>
</div>
<div class="form-group">
<label class="control-label col-sm-2" for="name">Quantity :</label>
<div class="col-sm-10">
<input type="text" class="form-control" id="qty"
name="qty" [(ngModel)]="model.qty" placeholder="Enter your Quantity">
</div>
</div>
<div class="form-group">
<label class="control-label col-sm-2" for="position">Price :</label>
<div class="col-sm-10">
<input type="text" class="form-control" id="price"
name="price" [(ngModel)]="model.price" placeholder="Enter your Product Price">
</div>
</div>
<div class="form-group">
<div class="col-sm-offset-2 col-sm-10">
<button type="submit" class="btn btn-outline-secondary" (click)="addProduct()">Save</button>
</div>
</div>
</form>
Step8: now add the app.component.ts file level to implement addProduct() functionality use following code
model:any={};
model2:any={};
msg:any="";
addProduct(){
this.products.push(this.model);
this.model = {};
this.msg = "Record is successfully added..... ";
}
Step9: to edit product record code add into app.component.html level below array records table
<h2>Update data:</h2>
<form class="form-horizontal">
<div class="form-group">
<label class="control-label col-sm-2" for="name">Name:</label>
<div class="col-sm-10">
<input type="text" class="form-control" id="name"
name="name" [(ngModel)]="model2.name" placeholder="Enter your Product Name">
</div>
</div>
<div class="form-group">
<label class="control-label col-sm-2" for="name">Quantity :</label>
<div class="col-sm-10">
<input type="text" class="form-control" id="qty"
name="qty" [(ngModel)]="model2.qty" placeholder="Enter your Product Quantity">
</div>
</div>
<div class="form-group">
<label class="control-label col-sm-2" for="position">Price:</label>
<div class="col-sm-10">
<input type="text" class="form-control" id="price"
name="price" [(ngModel)]="model2.price" placeholder="Enter your Product Price">
</div>
</div>
<div class="form-group">
<div class="col-sm-offset-2 col-sm-10">
<button type="submit" class="btn btn-outline-secondary" (click)="updateProduct()">Update</button>
</div>
</div>
</form>
Step10: Now add app.component.ts level to implement deleteProduct()/updateProduct()
deleteProduct(i){
this.products.splice(i,1);
this.msg = "Record is successfully deleted..... ";
}
myValue;
editProduct(k){
this.model2.name = this.products [k].name;
this.model2.qty = this.products[k].qty;
this.model2.price = this.products[k].price;
this.myValue = k;
}
updateProduct(){
let k= this.myValue;
for(let i=0; i<this.products.length;i++){
if(i==k){
this. products [i]= this.model2;
this.model2 = {};
this.msg = "Record is successfully updated..... ";
}
}
}
clickMe(){
this.msg = "";
}
Step 11: add css look and feel changing purpose in app.component.css file
.btn{
width:90px;
margin-left: 7px;
}
.container{
border: 5px lightseagreen solid;
margin-top: 7px;
margin-bottom: 7px;
}
.alert{
margin-top: 15px;
margin-bottom: 0px;
}